If you’ve ever seen an aerial postcard of Vancouver, you’ve almost certainly seen Grouse Mountain rising above the city. Sitting on the North Shore, it is one of Vancouver’s most recognisable landmarks and home to the legendary Grouse Grind, a steep forest trail famous for its brutal ascent from the base of the mountain to the summit area.
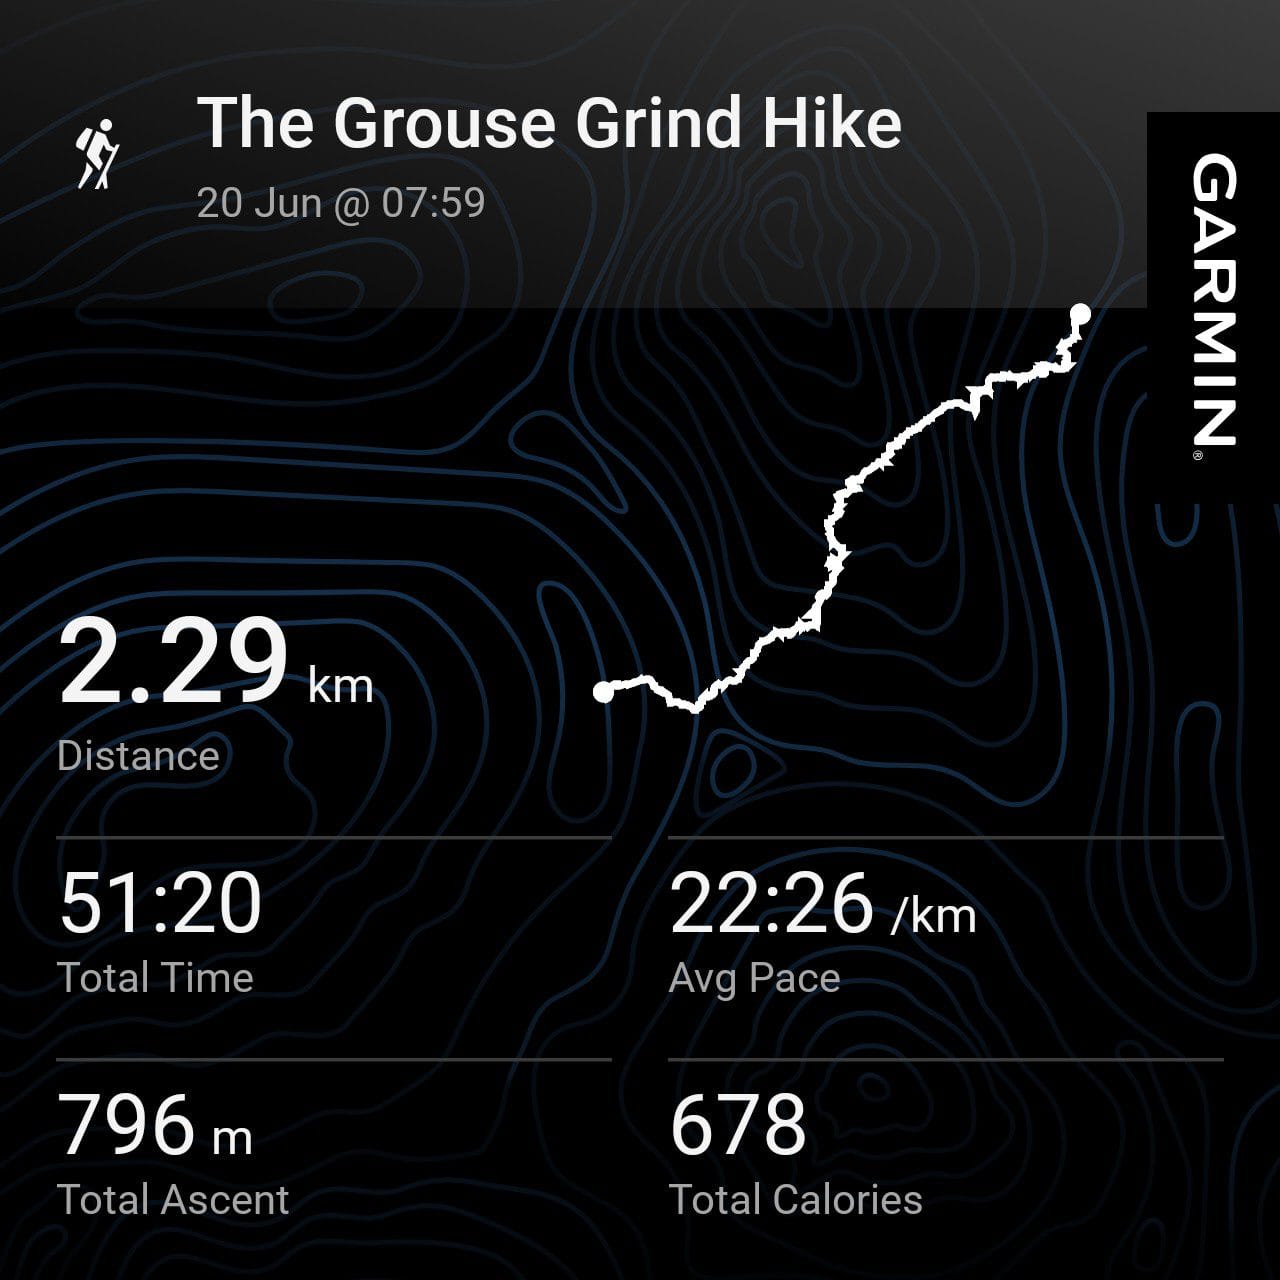
Known as Mother Nature’s Stairmaster, the Grouse Grind earns its nickname by climbing roughly 800 metres in only 2.5 kilometres. It is short, steep, sweaty and relentless, which is exactly why it has become one of the most famous hiking challenges in Vancouver. Locals and tourists regularly tackle the trail as a fitness test, racing up the wooded route against the clock before recovering at the top of Grouse Mountain.
This guide covers everything you need to know before hiking the Grouse Grind, including trail stats, difficulty, what to expect, pacing tips, transport, summit viewpoints and whether the hike is actually worth the hype. I’ll also explain the BCMC Trail, which is the better option if you want to hike down instead of paying for the Skyride gondola.
Mother Nature’s Stairmaster
Grouse Grind History Lesson
After hiking up the Grouse Grind for the first time, I wondered why it was named after the bird. It turns out the first recorded climb on Grouse Grind was in 1894 when a hunting party shot a blue grouse, hence the name. It took several decades for hikers to regularly climb Grouse Mountain in the 1920s. People would attempt to reach the Grouse Mountain Village cabins where The Cut ski run is now located. The Grouse Grind route, which people love, was first developed in 1981 by mountaineers looking for a training route.
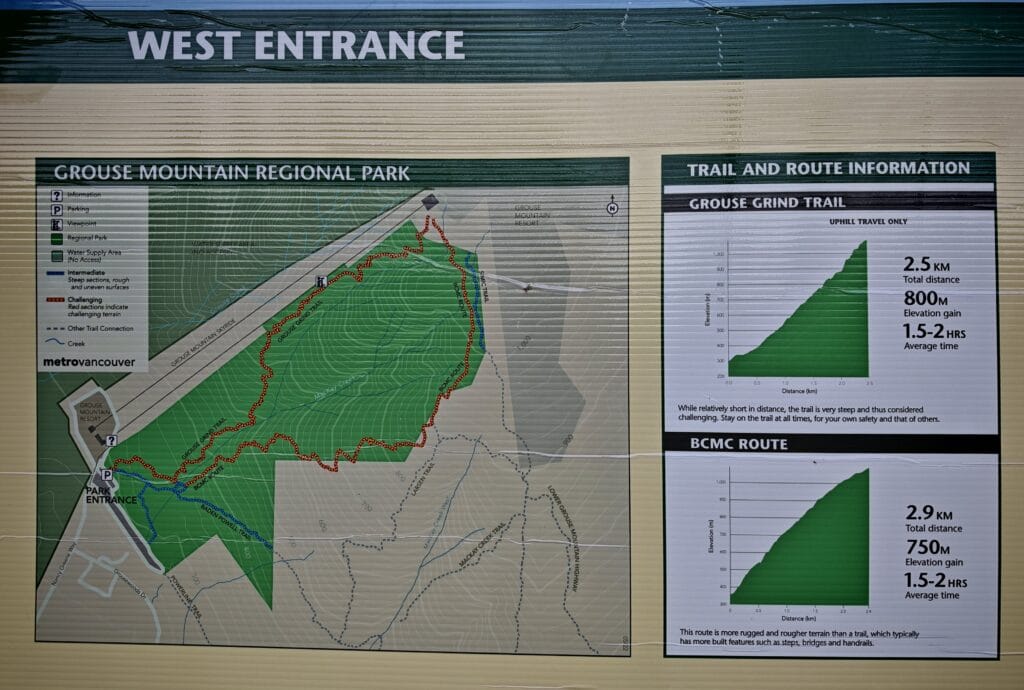
It’s been designed to be challenging and accessible to help prepare for longer hikes, as it is steeper than the sister route, the British Columbia Mountaineering Club route (BCMC Trail). The Grouse Grind® was officially christened with the Grouse Grind Mountain Run®, one of Western Canada’s top trail challenges. This trail is one of the most popular in Vancouver and attracts more than 100,000 hikers to the rugged terrain each year. The average gradient is 30degrees (56%) and starts at the Grouse Mountain valley gondola station and finishes at the mountain’s plateau.
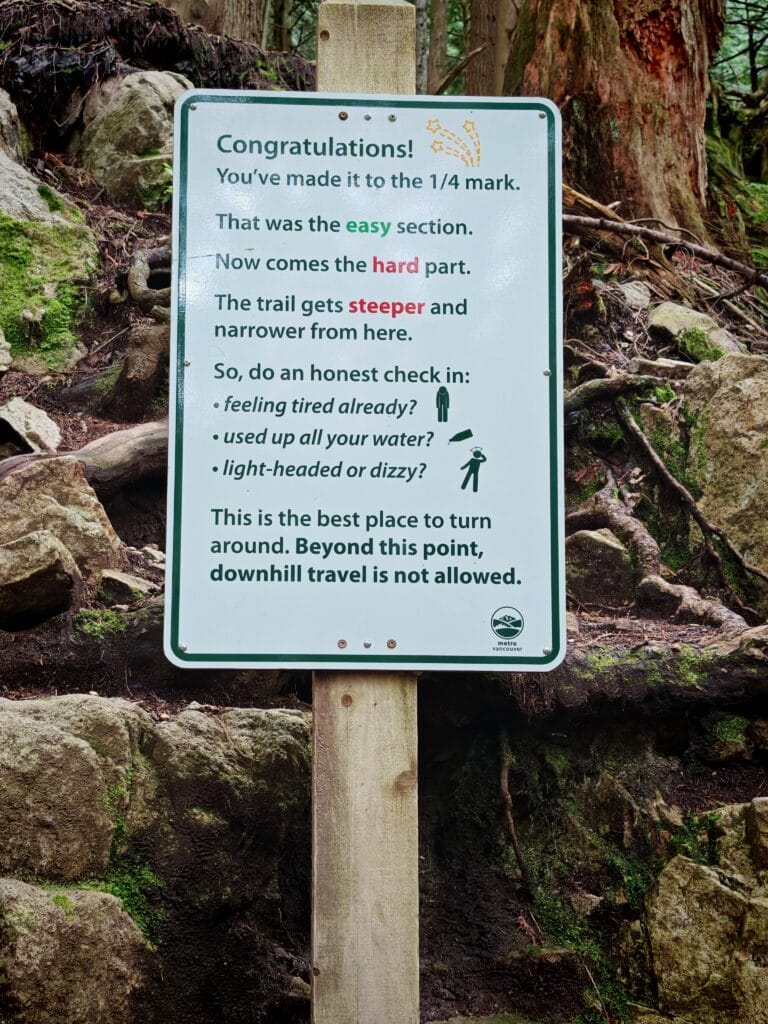
The route is regular maintain to ensure safety for the high volume of hikers and to protect the environment. The Grind is broken into quarters, with the 1st seemingly the longest but most gentle. Try to pace yourself before the second and third quarters, which are the steepest. The last quarter is not as steep, which means you can finish strong.
Grouse Mountain: Important Info
- Getting There– There is a very large car park on Capilano Road next to the Gondola and Skyride cable car. Additionally, there are toilets and a Starbucks next to the car park and start of the Grind trail. All the car parks at the base are paid for via the Pay-by-Phone App or machines. (3hours is $8 and a day ticket is $10). For public transport, the #236 bus from Lonsdale Quay or the #232 from Phibbs Exchange arrive at Grouse Mountain.
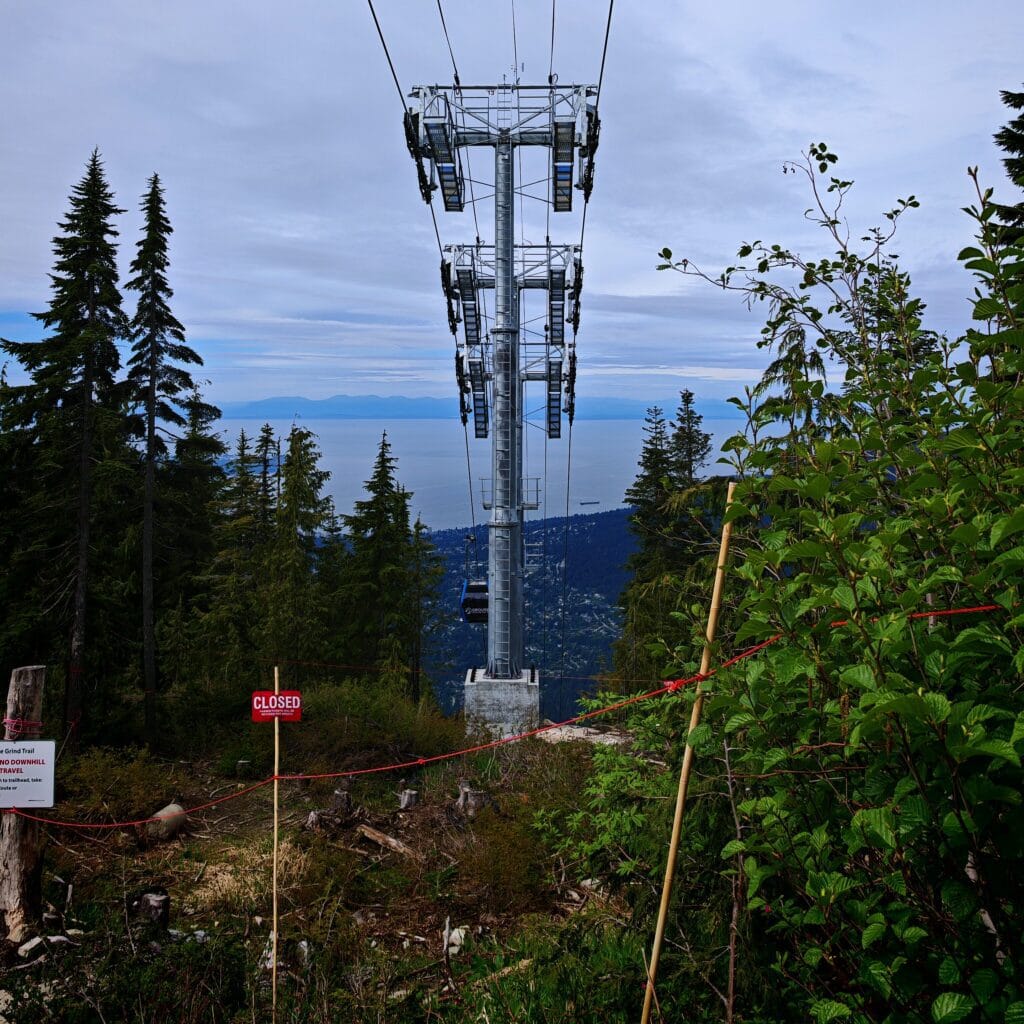
- Cost– Even though the hike is free to hike, if you don’t fancy doing the BCMC trail down the 800m slope, then the Skyride or Gondola are available. The cost to take the Skyride/Gondola back down is $20 per adult and $10 per child (ages 5-12) when buying Download Tickets online.
- Open Times– Over winter the trail is officially closed, and the openings vary each year depending upon conditions. Usually, the Grouse Grind is a spring to autumn hike only. For day open times, these adjust with the daylight but typically are 7:00 am to 7:00 pm in summer. It’s best to check the Metro Vancouver website times for updates.
- Clothing & Equipment– Good and proper footwear is essential on Grouse Mountain. I have seen many casual hikers in fashionable trainers, and whilst the path is well maintained, it is steep with tricky roots, rocks and stairs to navigate. Trail running shoes or hiking boots are the best choices. For clothing, lightweight and breathable sports gear that wicks sweat and moisture away will be beneficial. At the summit, another layer is nice to have as you will cool off quickly, and a waterproof jacket could be handy if the forecast is not favourable. A backpack is not necessary and will add weight to carry, but water is definitely needed.
Grouse Grind: Need to Know
- Fitness Levels– The Grouse Grind has 2830 steps so is classified as a serious workout and requires good levels of fitness. This is a hard cardio workout for potentially several hours, so be prepared. If you are in doubt, try the BCMC trail first or other Vancouver trails such as Lynn Peak to test yourself before the Grind.
- Duration– This is hotly debated as it really depends on the individual and trail conditions. Whilst most places say 2-2.5 hours to complete, I have done sub 1hour both times with a fast pace as an experienced and fit hiker. This is my breakdown of paces and levels from professional trail runners to novice hikers. The records are 23:48 by Sebastian Salas (Men) and 29:10 by Madison Sands (Women). Sub 30 minutes is elite level, and sub 40 is for fit trail runners. A time of under 1 hour is for fast advanced hikers. Under 90minutes is for an intermediate hiker, and under 2hours is for a beginner hiker.
- Trail Etiquette– With over 100,000 people of all ages and abilities doing the challenge each year, it is best to be patient with other hikers. If you are trying to overtake, then politely ask to pass on the left. Generally speaking, it is good practise to keep to the right side of the path. However, it is a narrow trail so it’s not always safe or wise to pass immediately.
- Dogs and Direction– Dogs are not permitted on the Grouse Grind or at the top of Grouse Mountain. This is for the well-being of the environment, other hikers and the wildlife on the trail. There are no exceptions! The Grouse Grind is a one-way ascent with NO down hiking permitted.
The Grouse Grind
The Grouse Grind can be likened to jumping on a Stairmaster at the gym. It is a serious challenge to not be underestimated. On the other hand, it’s a great short hike to test your fitness levels and race against the clock if you’re prepared. It is as much a mental challenge as a physical one, with the key to conquering it being to pace yourself and know your limits. Are you ready to take on the Grouse Grind?
Quarter 1
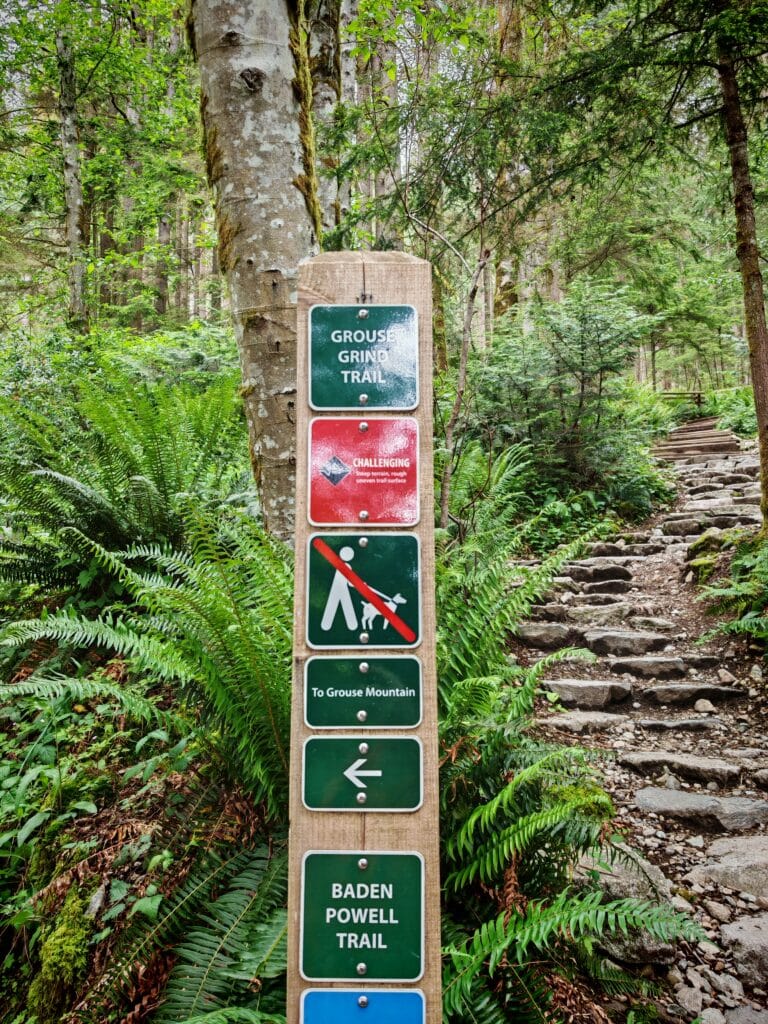
To start with, enter the forest through the wooden arch and begin hiking up the trail. The Grouse Grind and BCMC share the same first section before they split off, with the Grind clearly marked to the left. The path immediately kicks upwards with a rocky staircase for starters. The first quarter is the easiest compared to the rest, but after the flat car park, it hurts. There is a metal bridge in the quarter to give some rest before the steps and steep climb continue.
As you climb higher, it’s easy to elevate you heartrate, so please take a break if needed. And even as you gain height, it is a sweaty workout with the humidity in the trees. The trail continues up with some switchbacks past the quarter marker. Keep following the orange markers up the wooden steps into the hard middle quarters.
Middle Quarters
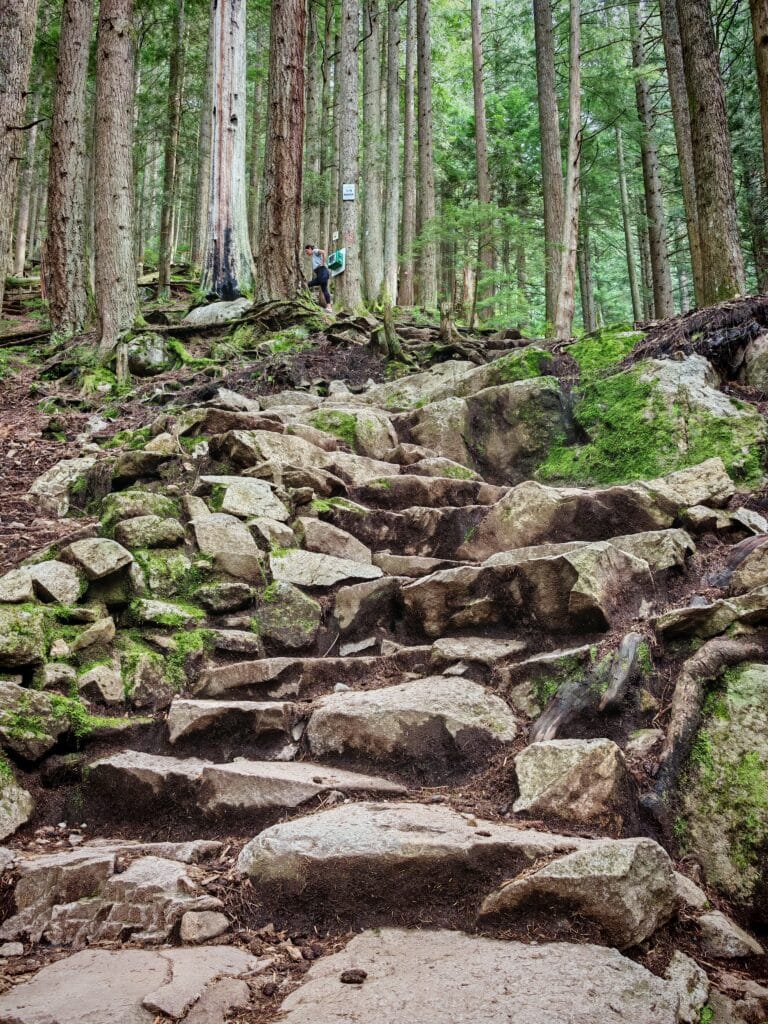
The 2nd and 3rd quarters are consistent in gradient over the same terrain of roots, rocks and wooden stairs. From experience, other hikers are spread throughout the trail, but it is more difficult to pass on the narrow path in the middle section. By the halfway mark, you’ll find a natural rhythm and pace that can be managed. Despite the lack of views, there is support and greetings from others on the Grind.
No matter how fast you’re pushing, the lactic acid will be building as you work higher into the forest. Occasionally, a gondola can be seen or a view of downtown through the branches. It’s worth noting that the steps are inconsistent and the large ones really sap the energy from you. For reference, there are markers on the trees out of 40 to give an idea of the progress as you climb higher and higher.
Last Quarter
I think the last sector feels the best as the gradient lessens slightly. The path widens up in the last few corners where people are either struggling to make it or attempting to finish fast. Even though the trail has become flatter, the main obstacles are the rocks over the path. The last part is a mini scramble up a smooth rock face as you emerge onto the gravelled plateau. The Chalet and Skyride Station are to the left, with the track to the BCMC off to the right. Congratulations, you’ve completed the Grouse Grind! Was it as difficult as expected?
Grouse Mountain
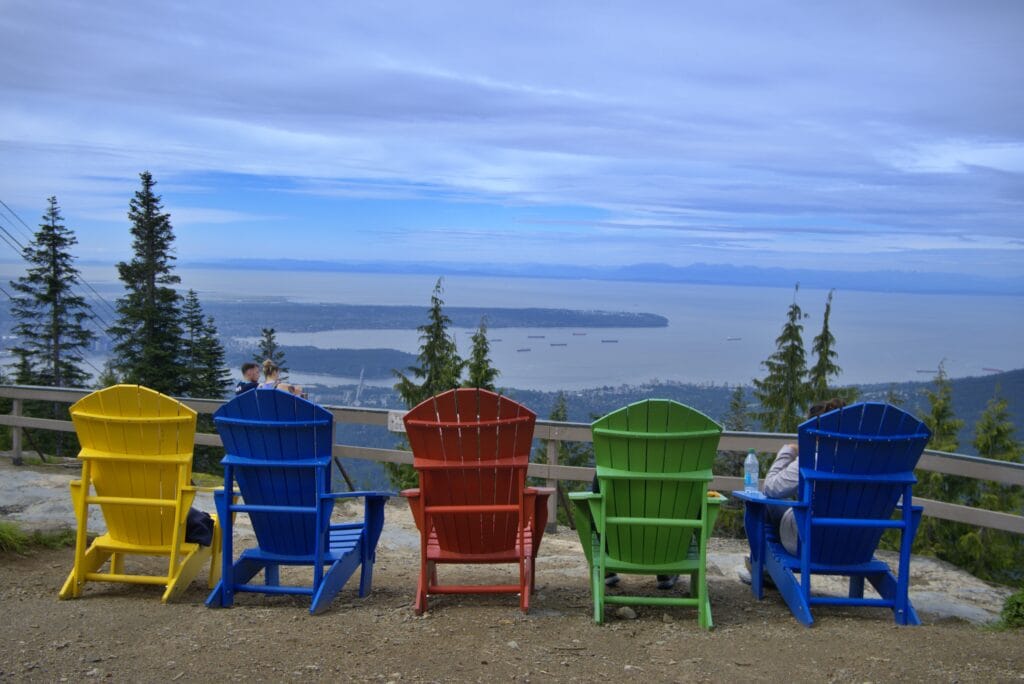
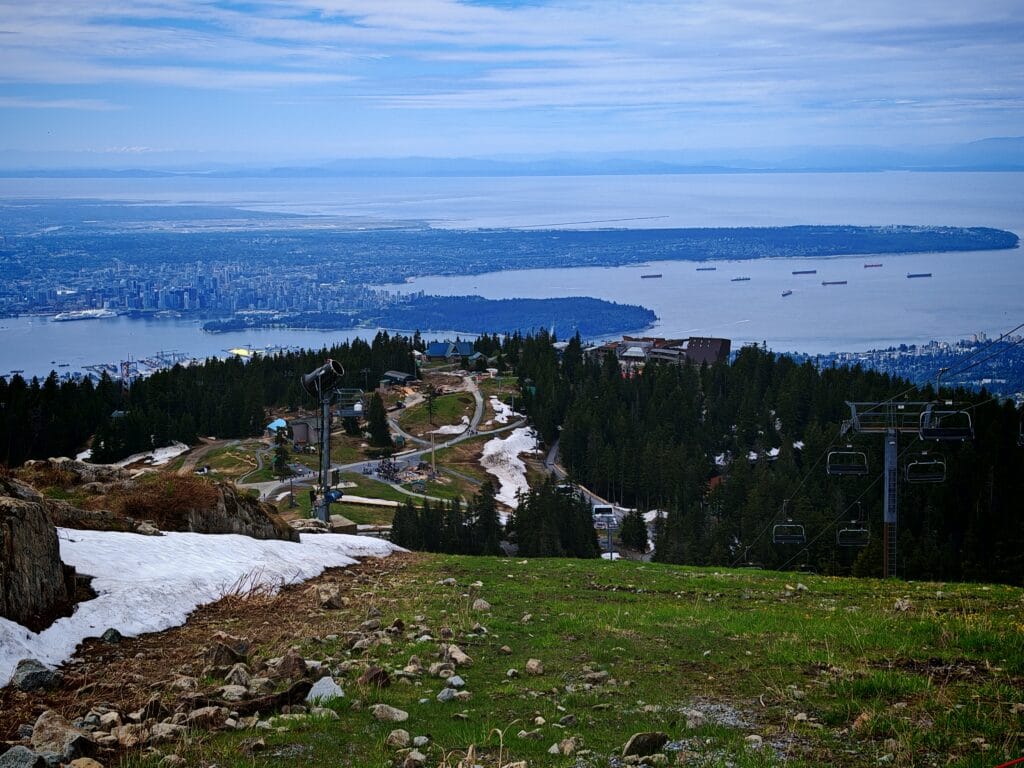
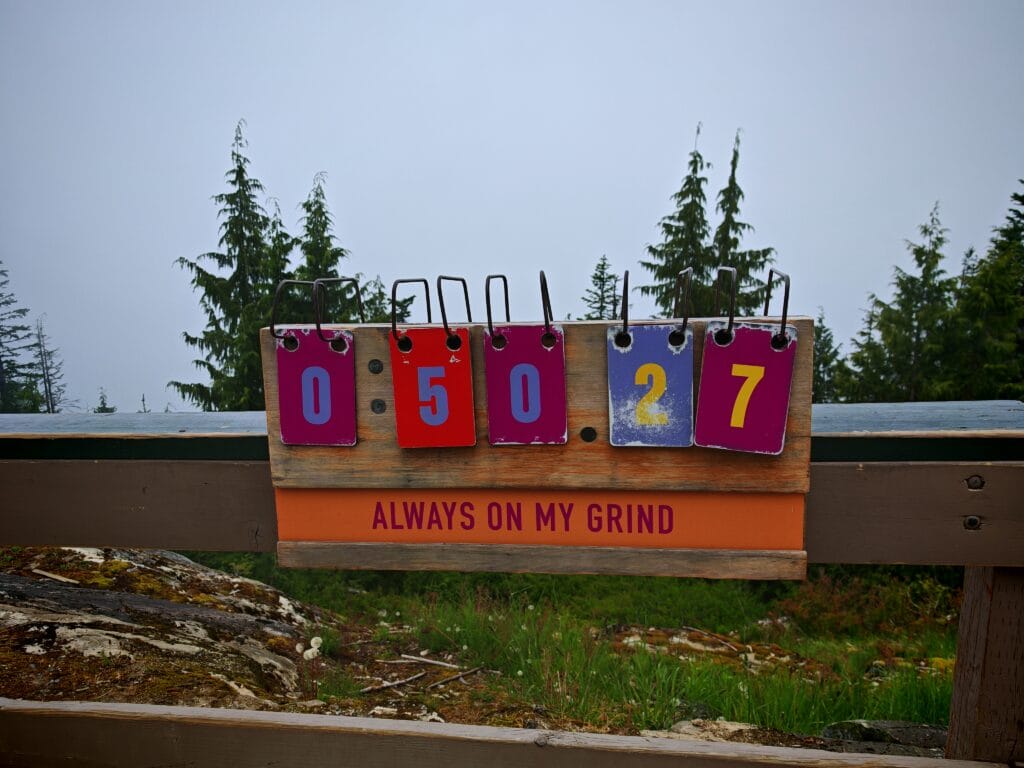
The reward for completing the Grouse Grind is stunning views down the mountain south over towards Vancouver downtown, Stanley Park and further afield. At the top, there are washrooms to freshen up next to shops, cafes, restaurants and lots more at the Peak Chalet. There is the Altitudes Bistro, the Observatory, the Rusty Rail, Coffee Bar and Lupins Café to choose from if you need a refreshment. It’s worth walking around to the Rainbow coloured chairs with the Grouse Grind counter there to showcase your time and grab a pic! The Lions are visible over to the West, and even better views behind the Chalet.
Vancouver Lookout
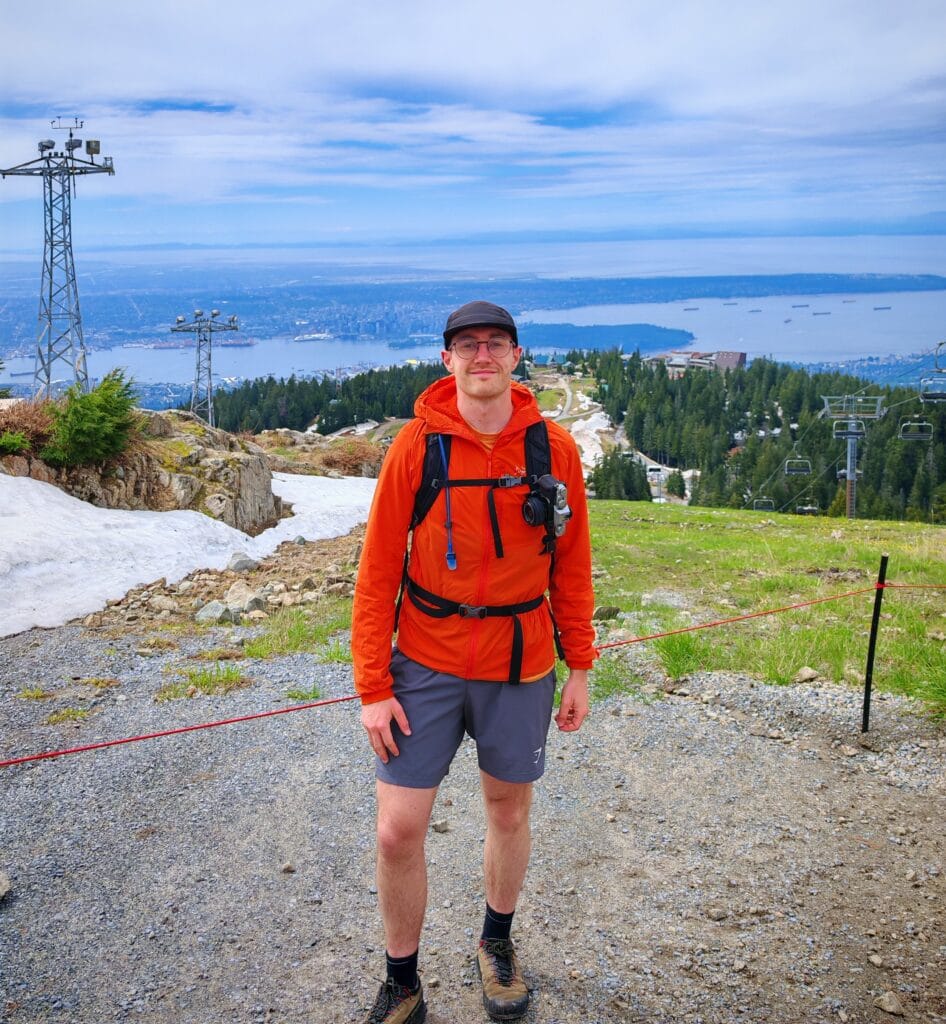
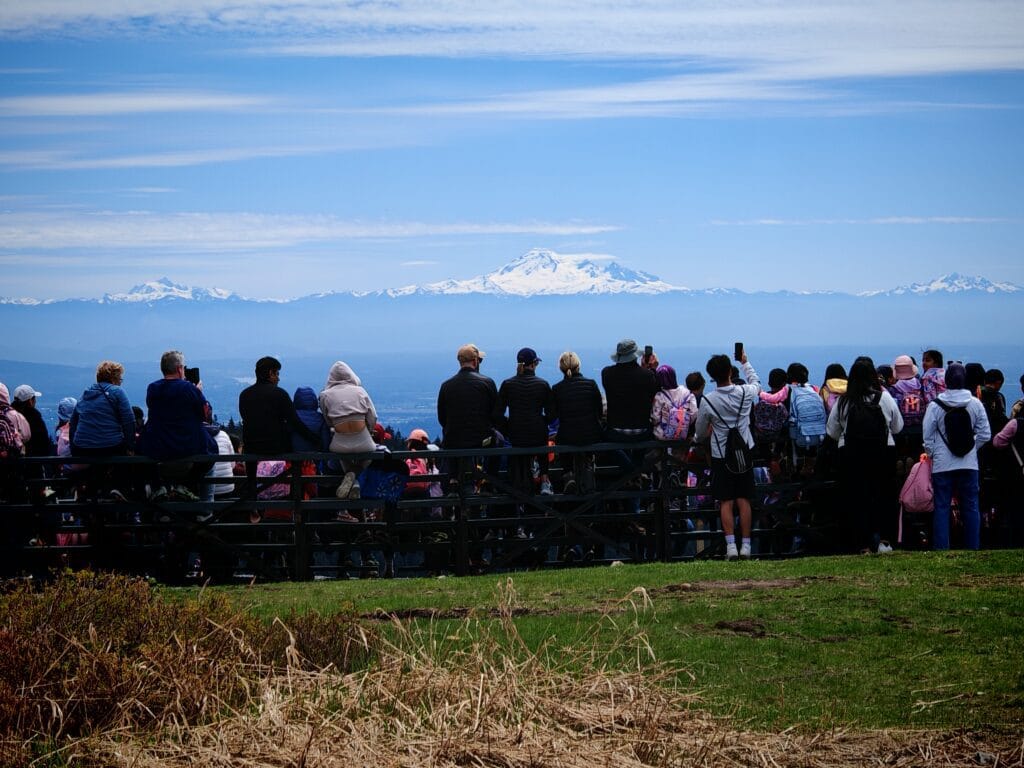
After the Grouse Grind, if you have enough energy, it is worth heading up another 122m (400ft) to The Peak. First, pass by the Rusty Rail & Grizzly Habitat, then choose either the chairlift up or the very steep gravel track to the side. The track took around 5-10mins to hike up past snow banks in early June. The top viewpoint is better than the lower lookout next to the end of the Grouse Grind. On a clear day, the view of Vancouver, Stanley Park, the Georgia Strait and Vancouver Island in the distance is stunning!
Wilderness Lookout
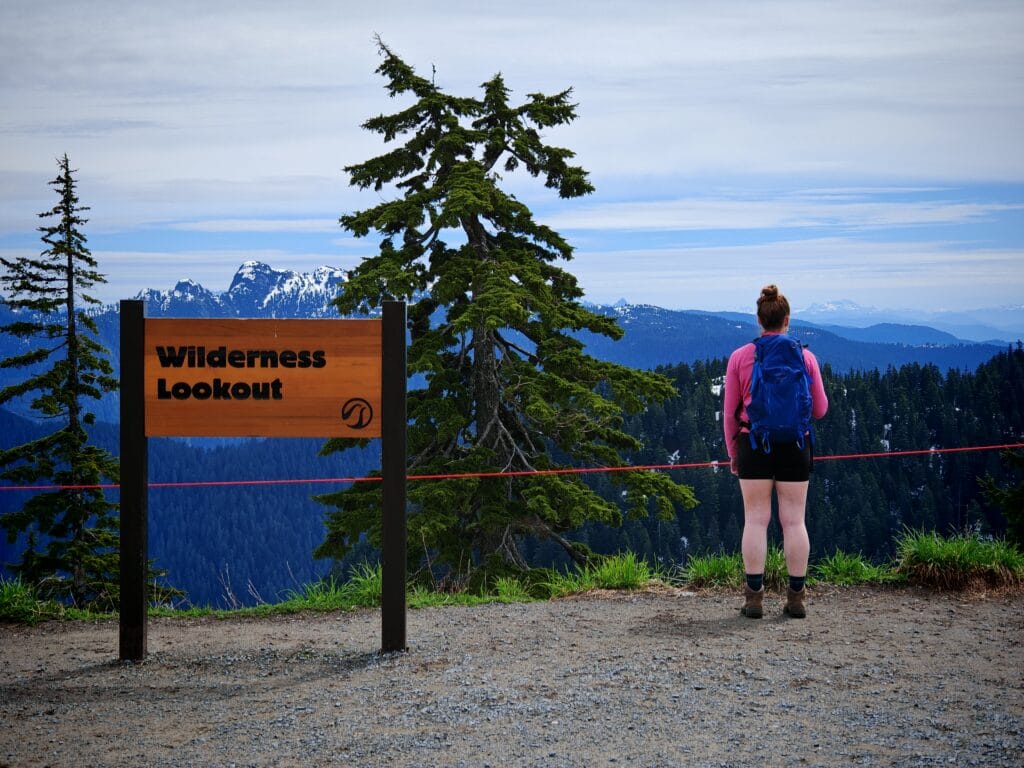
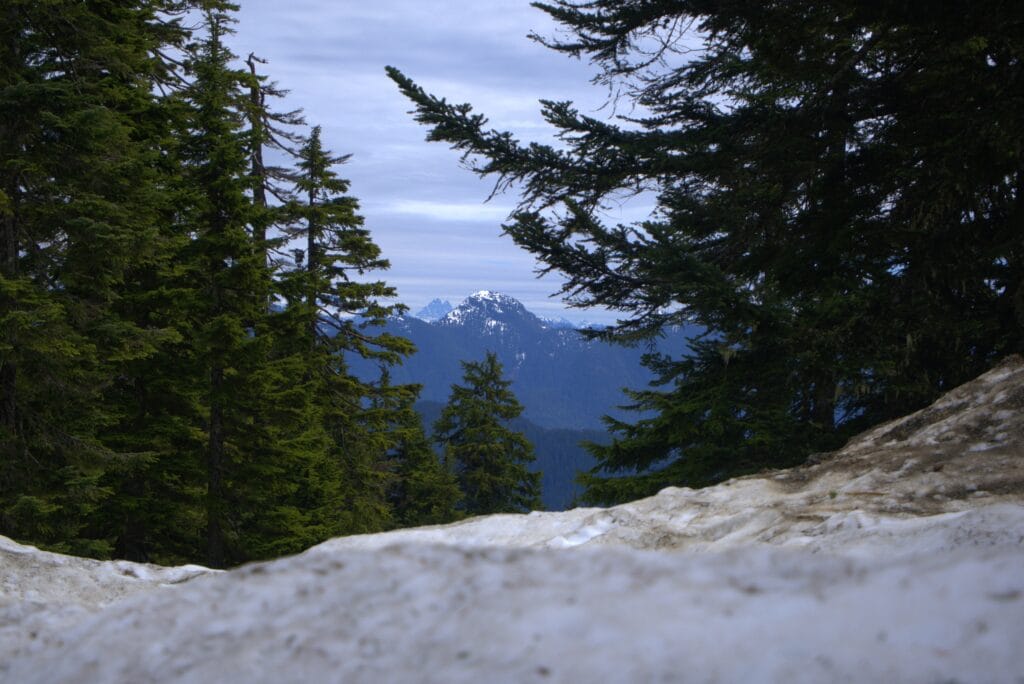
Located under the Eye of the Wind (currently closed), the Wilderness Lookout is on the east side of Grouse Mountain. It looks past Lynn Peak and over to Mount Seymour Provincial Park with great views north as well. The mountains are covered in pine trees with snow splattered on the summits. We enjoyed a lunch spot here in the relative quiet compared to The Peak and the other mountaintop attractions. It’s a steep descent down the gravel track where trekking poles were handy.
The BCMC Trail
The BCMC Trail is the quieter and gentler sibling of the Grouse Grind. I have hiked down the BCMC once, and trail run it another time; both times were peaceful after the crowds at the top. There is a slight detour to start with, so join the BCMC next to the metal shipping container. The upper sections are muddy and more technical to descend, so be careful. Similar to the Grind, there are wooden steps and large rocks but even more tree roots. With the Grind being a one-way-only route, the BCMC is a nice downhill route that takes around 1-1.5hours to descend.
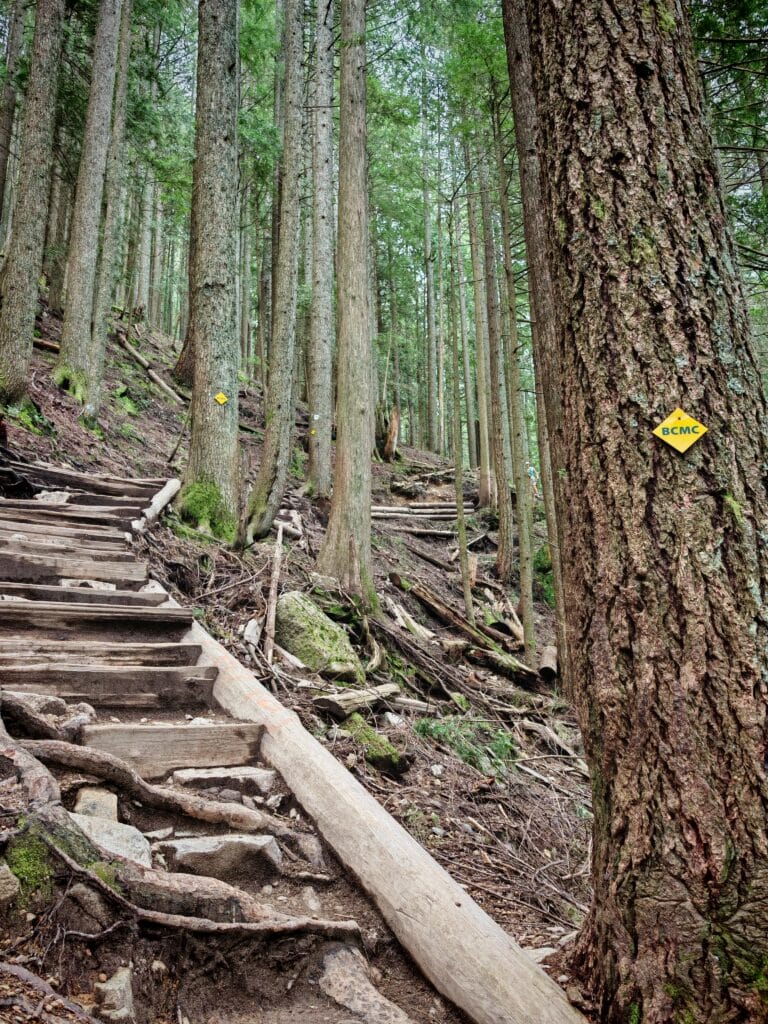
The lower half of the trail feels much easier, with wooden steps making it a fast section. There are some quarter markers like the Grind, but there are more places to rest and stop. I enjoyed seeing only 10 people hiking up compared to the maybe 100 on the Grind. The last section is like a small boulder field along fallen trees before it joins up with the Grouse Grind and Baden Powell Trail. I have not had a chance to climb up the BCMC path yet, but I did enjoy the route as a trail run.
Trail Tips
- Bring water and make sure you’re fuelled before the Grouse Grind. An energy bar, banana or snack is good to bring along to keep you energised during or after the Grind.
- Wear appropriate footwear and breathable layers. A 2nd layer could be useful for after the hike.
- No dogs or downhill hiking on the Grouse Grind; use the BCMC as an alternative route down.
- Keep hiking to the right and allow others to pass on the left.
- Don’t rush out too fast and break the hike down to the quarter sections to pace yourself.
- At weekends it is busy on the Grouse Grind, so early mornings and weekdays are quieter
Hiking Highlights
- Completing the Grind– With little views on the way up, the reward is the satisfaction of completing the gruelling grind up the 2830 steps.
- Vancouver Lookout at The Peak– The best mountain top view of Vancouver and Stanley Park. Either do the short but steep hike up or take the chairlift for incredible views!
- Wilderness Lookout– My preference was the viewpoint under Eye of the Wind (Turbine), which shows the backcountry mountains. It is much more peaceful than the Vancouver Lookout too.
- Grouse Mountain Attractions– A family-friendly plateau with something for everyone. There are shops and places to eat & drink after the grind or ascent. Then you can watch bird shows, lumberjack shows, ranger talks, or see bears in the grizzly habitat. There are options to pay extra for ziplines, rope courses and the bike park.
Hike Rating
Rating – 3.5 / 5
The Grouse Grind might be one of the most famous hikes in Vancouver, but it is not the most exciting or scenic route on the North Shore. Its appeal comes from the challenge: climbing roughly 800 metres in just 2.5 kilometres, right on the edge of the city. That makes it unique, accessible and brutally effective as a fitness test.
As a hiking trail, though, the Grouse Grind has some clear drawbacks. It is often crowded, there are limited places to rest or overtake, and there are almost no views along the way. Most of the hike is a steep, wooded stair climb, which can feel more like an outdoor workout than a classic mountain route.
That said, the Grouse Mountain summit area is worth exploring once you reach the top. The viewpoint near the gondola is good, but I would recommend continuing higher or taking the chairlift to The Peak, where the Vancouver Lookout and Wilderness Lookout offer much better views over the city, ocean, mountains and surrounding North Shore.
The BCMC Trail is also worth knowing about. It is quieter, more natural and can be used as a descent route if you want to avoid paying for the Skyride. If you are only interested in views and wilderness, there are better Vancouver hikes. But if you want to tick off the city’s most famous hiking challenge, the Grouse Grind is still worth doing once.
Stay tuned for more Vancouver and British Columbia hiking trails, route guides and ratings.
FAQs
How hard is the Grouse Grind?
The Grouse Grind is a hard hike because it climbs around 800 metres over only about 2.5 kilometres, with thousands of stairs, roots and rocks. It is commonly called “Mother Nature’s Stairmaster” because the route is steep, sustained and physically demanding from start to finish.
How long does the Grouse Grind take?
Most hikers take around 1.5 to 2 hours to complete the Grouse Grind, although fast and experienced hikers may finish in under an hour. The time depends on fitness, crowds, trail conditions and how often hikers stop on the way up.
Can you hike down the Grouse Grind?
No, downhill hiking is not permitted on the Grouse Grind because the trail is one-way uphill only. To descend, hikers can either pay for the Skyride gondola or use the BCMC Trail, which is a separate two-way trail beside the Grind.
Is the BCMC Trail better than the Grouse Grind?
The BCMC Trail is quieter, more natural and can be used for both ascent and descent, while the Grouse Grind is steeper, busier and more famous. The Grouse Grind is better as a fitness challenge, while the BCMC Trail is better if you want a less crowded forest hike or a free descent option.
When is the best time to hike the Grouse Grind?
The best time to hike the Grouse Grind is usually from May to October when the trail is snow-free and officially open. Early mornings and weekdays are generally quieter, while weekends can be busy because the trail is one of the most famous hikes in Vancouver